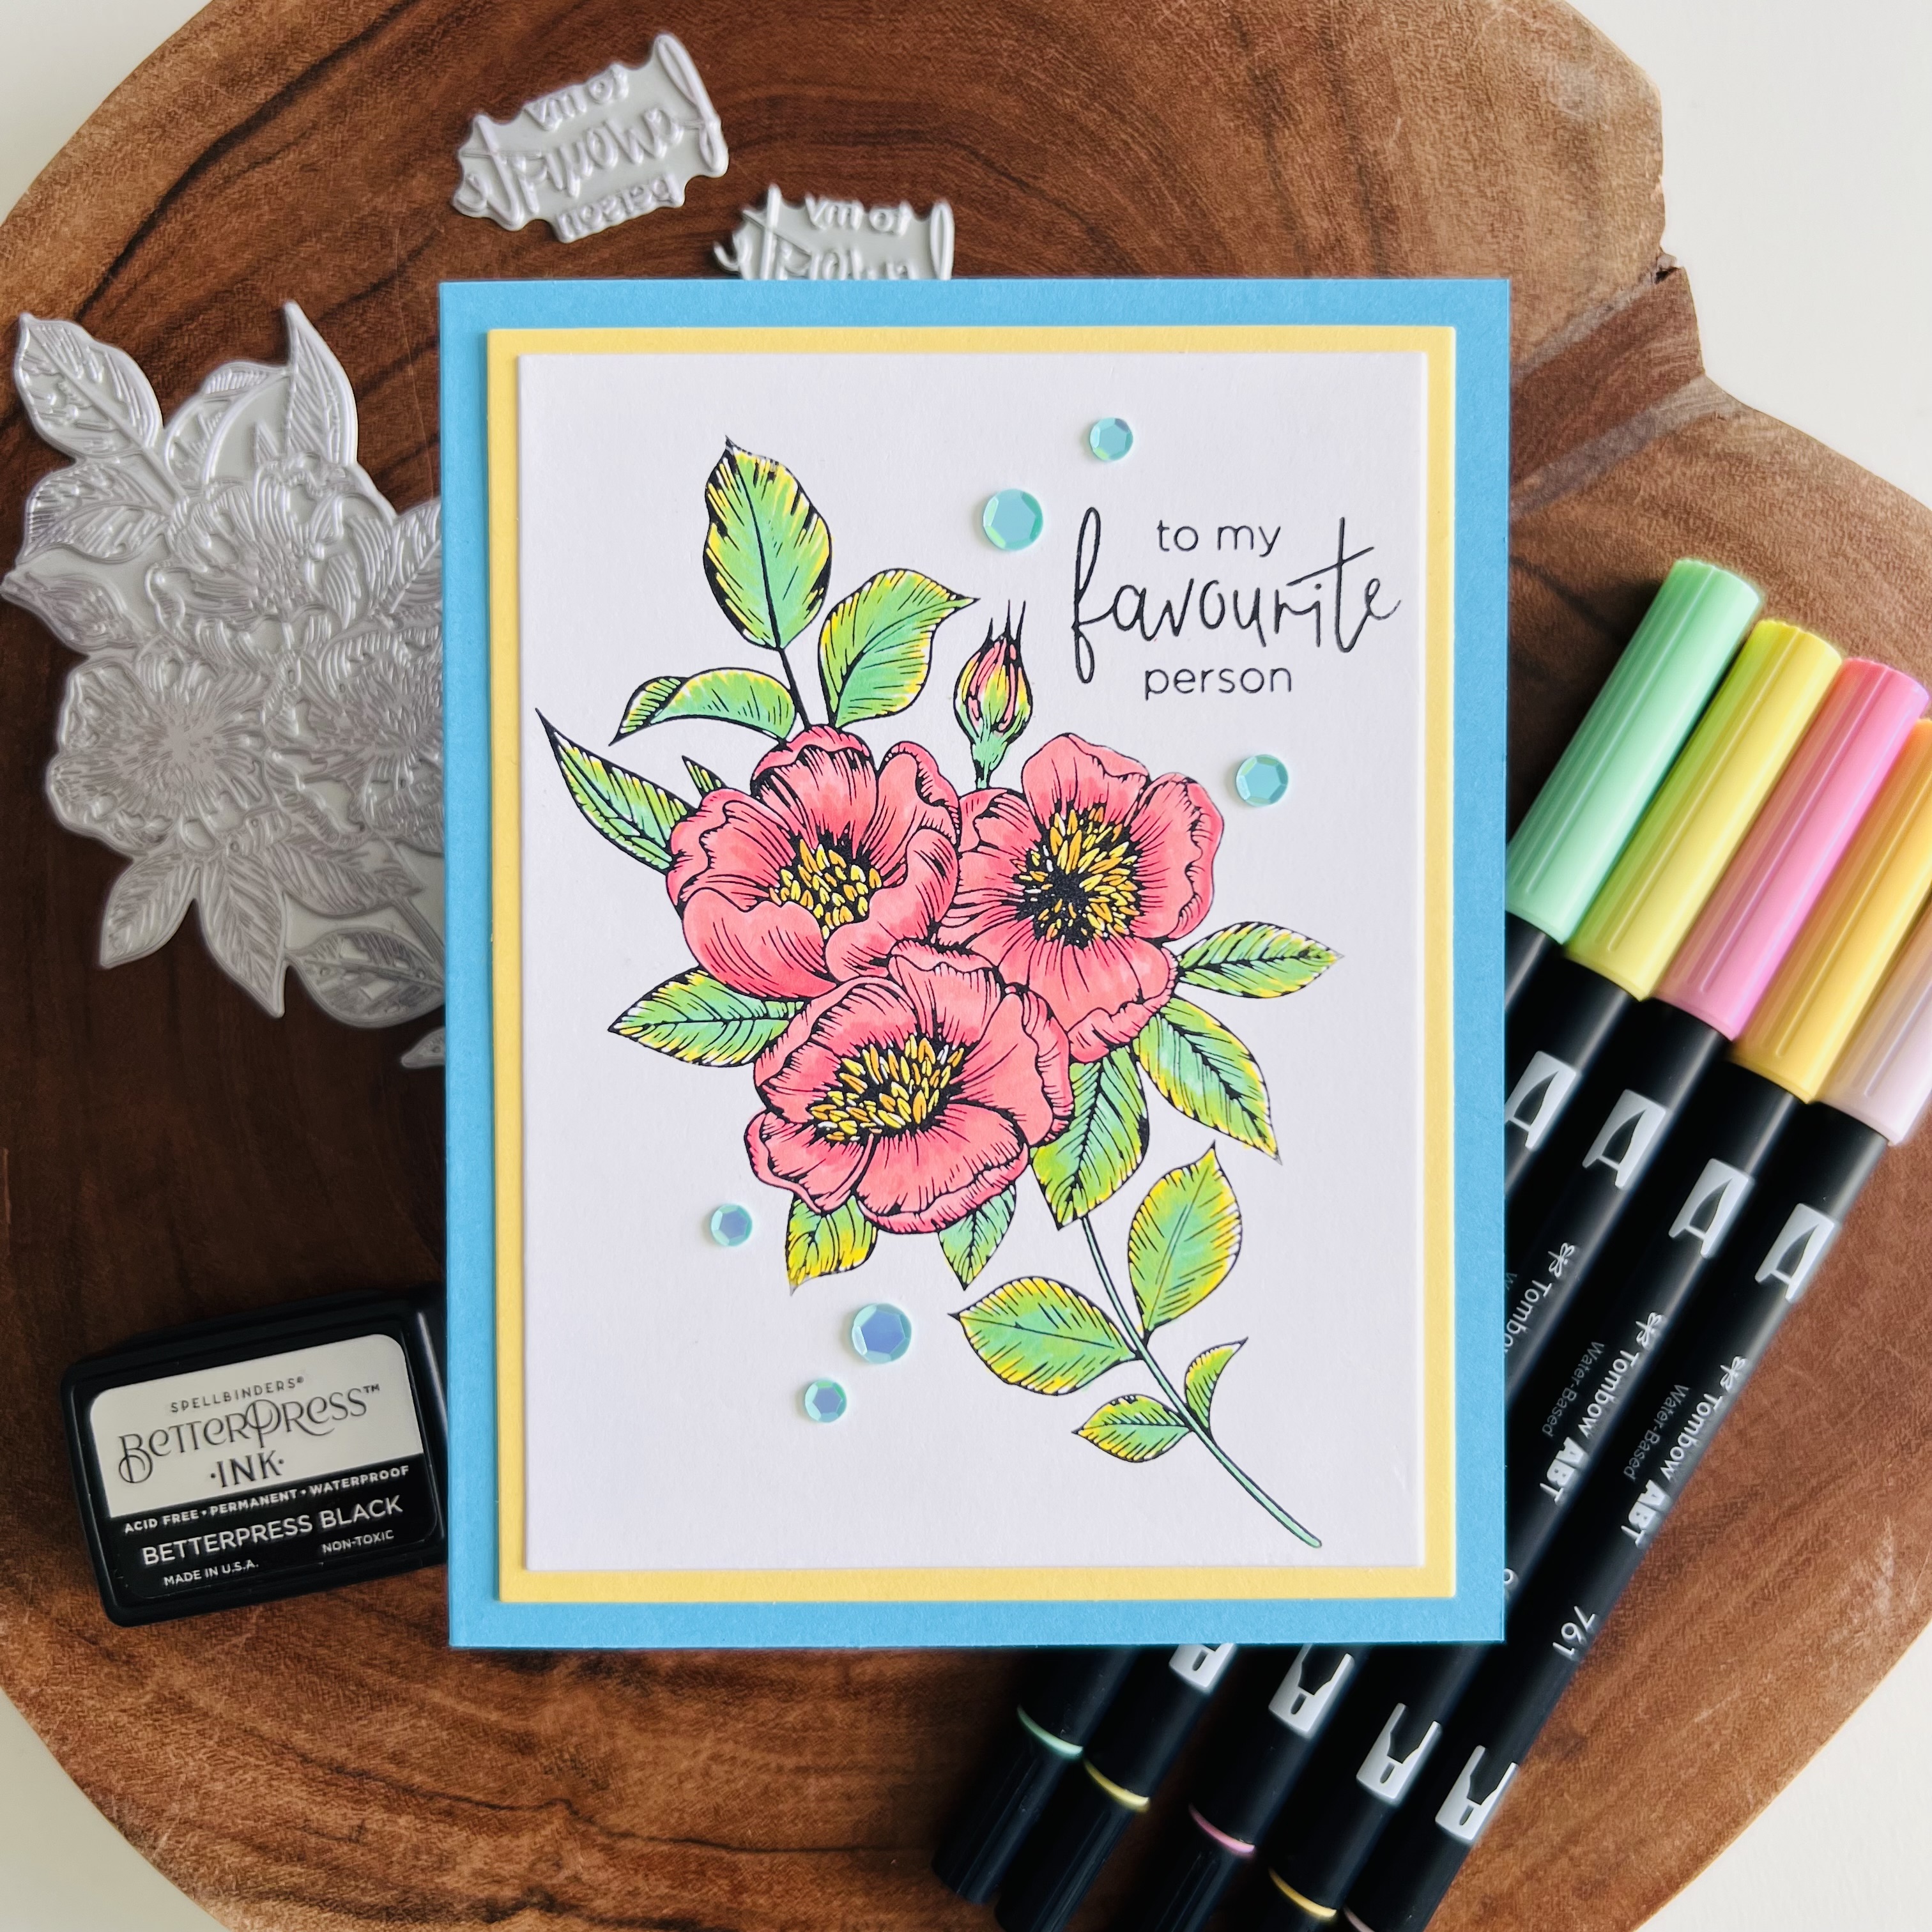
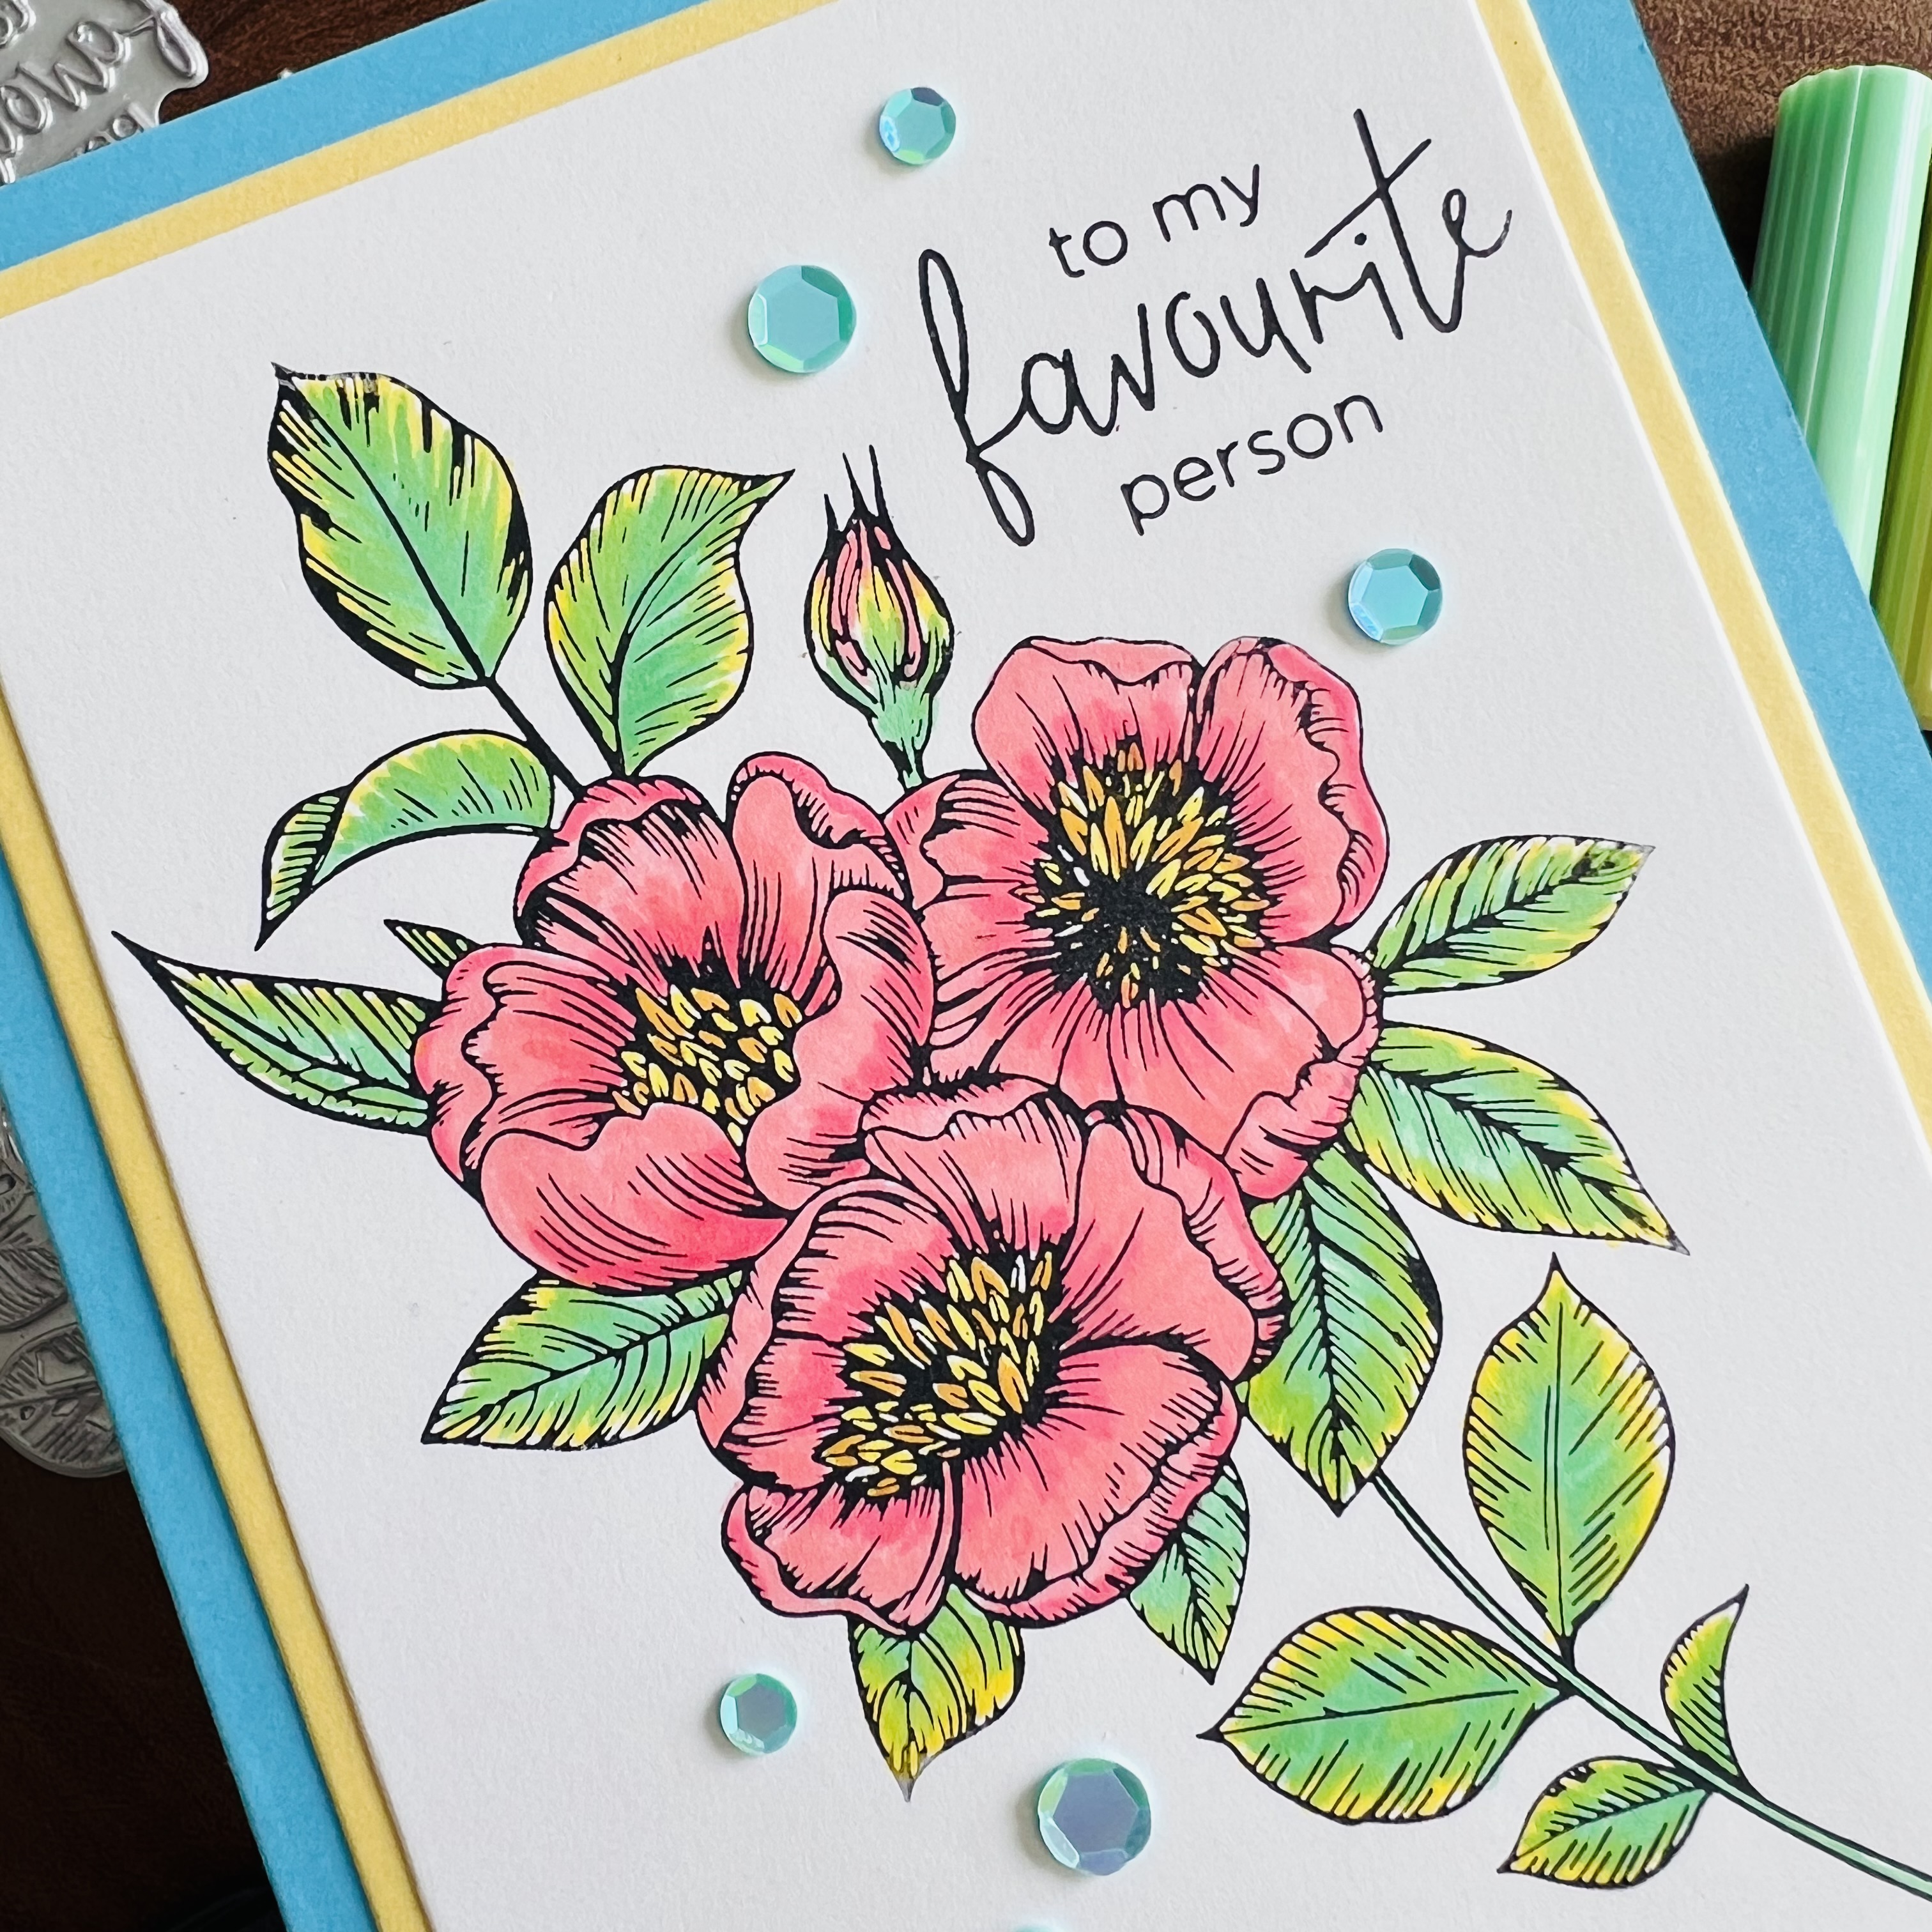
Hey there! It has been a while since my last post, but here I am. I got some inspiration from talented Donna Mikasa to participate in a challenge called Throwdown Challenge #753. My card features a beautiful Better Press LetterPress plate from Spellbinders and the color combo for the challenge: pink, aqua, yellow and lime.
This is a simple card, using the BetterPress black ink and coloring with some Tombow markers. I have to point out that the pretty plate and a couple of sentiments are included in the BetterPress box.
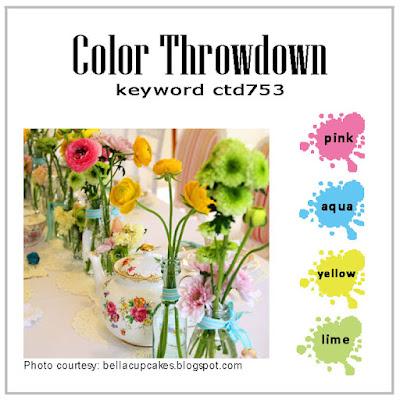
Here is the image of the challenge:
Thanks for stopping by. Have a Great rest of the week!
Today we are celebrating the launch of the Winter 2020 Catalog Release in the Hero Arts store with a fun inspirational Blog Hop. As of today, you can see and get all the new fabulous Winter products at the HA store. Very exciting! Check it out:
As part of this hop, I created two cards. For the first card, I used the Color Layering Gingerbread House Combo. This combo includes a stamp set and matching frame cuts. The color layering stamp sets are a lot of fun to play with and the Misti Mini Hero Black or the Misti Regular Black are a great help when using this kind of stamps.
Be aware that my post includes affiliate links, which means that if you click on and shop through them, I will receive a tiny commission from Hero Arts at no cost for you. Thanks!
So, I created a plaid background and then, I adhered this panel over a folded card. Next, I stamped the cute gingerbread house using different colors of ink. Additionally, I stamped the small images and I die cut all the images.
I continued to stamp the sentiment over a white cardstock square and I adhered it over the card with foam tape. I adhered the house and other tiny images also with foam tape to add dimension. Last but not least, I finish off this card with some enamel dots and some Glaze details.
The second card features the Fawn and Friends Combo and I paired it with a sentiment from a set called Comfort and Joy Messages.
This time I created a subtle background over a white panel. I adhered this panel onto a folded card . I also used the Staircase Fancy Die to be part of the background for the cute friends there. The doggie and kitty were simply stamped with black ink, colored with watercolors and die cut with their matching frame cuts.
I complemented the card with a sentiment an some gifts images also included in theComfort and Joy Messages set. I colored those too and I finish off my card with some Glaze details and some enamel dots.
Hero will give away three $50 gift cards, drawn from the comments left across the hop. Enter by leaving a comment between now and Sunday, September 6th at 11:59pm Pacific, and the winner will be announced on the Hero Arts blog the following week.
Please be sure to visit all the participants blogs in order to increase your chances of winning:
Oh yes! We already have to start our winter projects and for that I am happy to share that the NEW Joy & Wonder Project Kit by Fun Stampers Journey is now available at the shop, take a look:
This kit comes with an assortment of ONE Embossing Folder, TWO die sets, TWO Stamp Sets, and a card making project kit to make FOUR cards. Also included are full color instructions and an online Video Tutorial. You will be guided through every step of the way as your create die cut projects:
Be aware that my post includes affiliate links, which means that if you click on and shop through them, I will receive a tiny commission at no cost to you. Thanks!
I chose one of the sets included in this kit create two different cards. This stamp set is called Arctic Wonder and I also used its matching die set. So the first card features three of the bear images over a striped background made of cardstock strips.
This is an easy way to create a colorful background for your cards that will make your stamped images stand out. The sentiment was simply white-embossed over a Black Licorice stitched circle, and of course some sequins made the trick to embellish this cute card.
The second card showcases the other three bear images included in the set. With that many bear images you have a lot of choices to create the perfect arctic scene, don’t you think? I stamped the images over Whip Cream cardstock with Black Licorice ink, and I arranged them over a Whip Cream panel. After that, using my Misti I stamped the sentiment and I enhanced it with Journey Glaze.
This time, I used a Holiday Cheer Prints rectangle as the background/mat for my card. I used front and back of the same sheet. The snowflakes pattern for the largest panel and I used the other side of the paper to create a strip, which also serves as the base for my bears, so they don’t look like they are floating 😉
I finished off this card with a silver snow flake, some silver-embossed tiny snowflakes and some silver sequins.
The new Happy Place Collection by Fun Stampers Journey is here! Yes! I am quite excited about this collection because it is so fun to play with. The collection includes stamps and dies perfect to create summer projects. Today, I am sharing a card that I created using a die set called Pool with a View die set and a sentiment included in Make a Splash stamp set…
The die is so versatile, you can either use it to simply create a swiming pool or create a swiming pool shaped shaker window… It is just perfect for both looks, it is up to you! For this card I began by making a printed paper rectangle and matting it with Whip Cream cardstock. Then, I adhered the panel over a Haystack folded card. After that, I die cut the summer umbrella, pool, leaves and ladder from different color of cardstock. Then, I simply arranged them over the card.
Be aware that my post includes affiliate links, which means that if you click on and shop through them, I will receive a tiny commission. Thanks!
I continued by stamping a sentiment and I trimming it with scissors. I included a stripe of Whip Cream cardstock and I complemented with some tiny flowers, gemstones and hearts. Always fun to create with new awesome products!
This year we are neither having a parade, fireworks nor a big celebration, but what we have is the opportunity to celebrate united with our hearts and be proud to be Americans. I have been a US citizen for more than five years now, and I am very proud of that and of living in this amazing country. So, I just wanted to wish you a very Happy 4th of July with this card:
Some of my friends/co-workers retired this year so, since retirement cards are some of those that I dont make very often, I made some to send to them by mail. Without really paying attention if I was using current or discontinued products, I chose some Spellbinders products that I have in my stash to create my cards….
Be aware that my post includes affiliate links, which means that if you click on and shop through them, I will receive a tiny commission. Thanks!
I also used another discontinued die set called Happy Expressions and I complemented the word “happy with the word “retirement” which I printed out with my handy dandy printer over Whip Cream cardstock. I created four cards total, same design, different colors…
Just in time to switch gears to Summer, the new Happy Place Collection by Fun Stampers Journey will be released in the Spellbinders shop on July 10th. But, there is a fun Project Kit already available for purchase, which includes stamps and dies perfect to create some pretty awesome cards.
Be aware that my post includes affiliate links, which means that if you click on and shop through them, I will receive a tiny commission. Thanks!
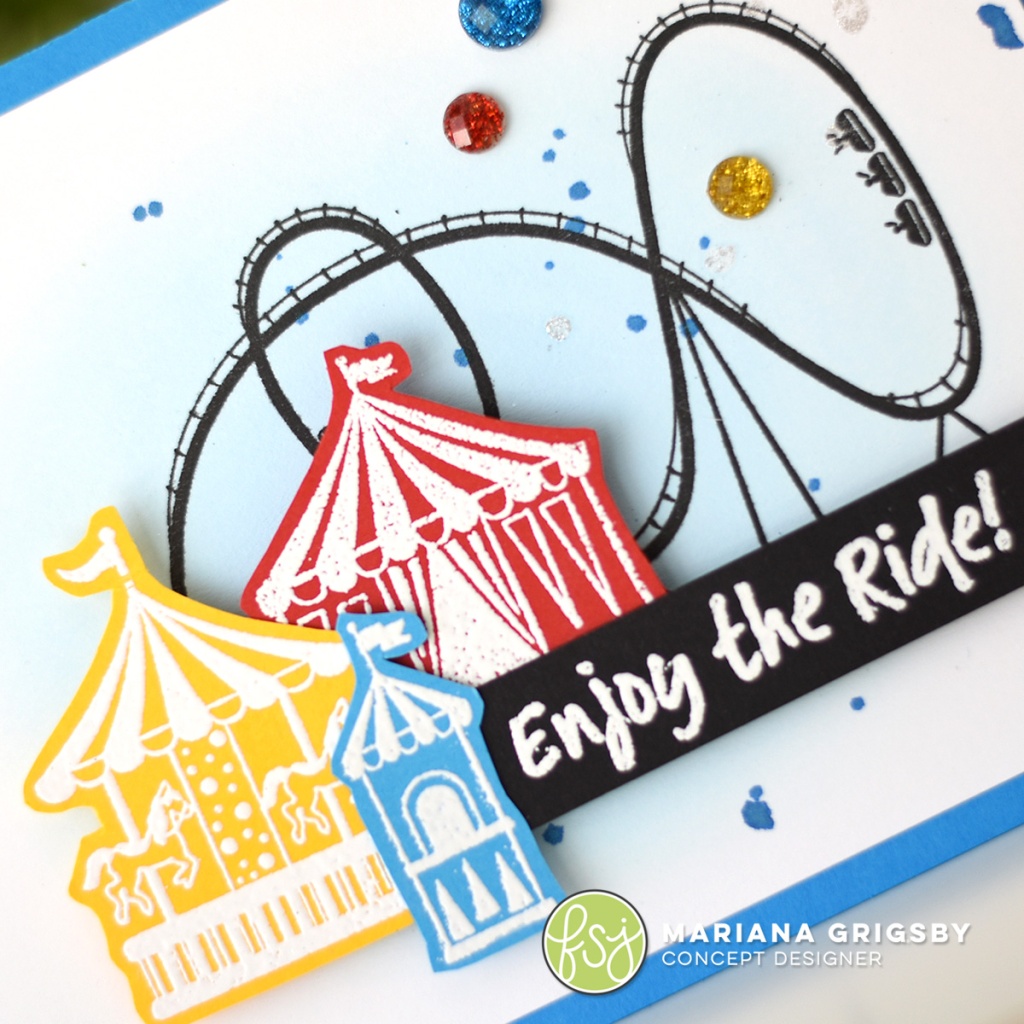
So, using the Enjoy the Ride stamp set (included in the kit), I created a card…
Lately, one of my favorite things to do is to create subtle backgrounds using Liquid Colors and a sponge dauber (you can see a quick video >>>HERE<<< This is an easy great way to keep your creations simple, and let the stamped images shine! After that, I stamped the rollercoaster image onto the background with Black Licorice Ink and I used silks to leave some fun splashes of color!
Then, I white-embossed some images over different colors of cardstock and arranged them over the background. Last, but not least I embellished the card with some gemstones.
Hello, hello! Quick post today just to share a card that I created for today, featuring an ATS stamp set called Born to Grill by Fun Stampers Journey.
This is a small set that currently is on sale and obviously you can use it for Father’s Day or other occasions. No special recipe for this card, just Black Licorice and Whip Cream inks over different colors of cardstock. Quick and easy.
Be aware that my post includes affiliate links, which means that if you click on and shop through them, I will receive a tiny commission. Thanks!
Here is the color combination that I created using FSJ cardstock colors:
Please don’t forget to click on the image below, this sale is ending soon:
Anyway, I hope you all can celebrate today your husband or father or both. I know this year might not be the right one to have a big gathering, but as far a we can celebrate them in certain way it will make this day special.
———- ♥ ———
Well, that’s all from me today. I´ll be back soon to share another project. Thanks for stopping by, have a wonderful crafty rest of the weekend!
Hello there! Quick post today sharing a card featuring a Fun Stampers Journey stamp set called Hit the Road. This set can be used to create cards as well as scrapbooking projects…
I used the main image along with a sentiment for this card. The vintage truck image is perfect to color and in this case, I stamped it onto River Stone Carstock with Black Licorice ink. Then, I colored it with my Journey Color Burst color pencils, using the Whip Cream color pencil at the end to add some details that give the truck a bit of dimension (according to me 🙂 )
Be aware that my post includes affiliate links, which means that if you click on and shop through them, I will receive a tiny commission. Thanks!
Next, I created the Whip Cream panel using the Gilded Nested Rectangle die sThen, I created the Whip Cream panel using the Gilded Nested Rectangle die set, which basically are rectangles with beveled corners… they look really really nice! So, I simply stamped the route map image with River Stone ink over the rectangle. After that, I adhered the panel and truck over a Rock Candy folded card, and I included a strip of Black Licorice Sparkle washi tape that I affixed with a few staples. I finished up this card with some sequins and a white-embossed sentiment over a Black Licorice strip.
Happy Tuesday, everyone. Now that I have been enjoying some of my “stay at home time” doing some crafts, I got to play with a Spellbinders die set that I like a lot and it is called Botanical House, so I created this card:
Be aware that my post includes affiliate links, which means that if you click on and shop through them, I will receive a tiny commission. Thanks!
It seems like it was a lot of work but it really wasn’t at all. It was like playing with a little puzzle.
I began by die cutting the house using four different colors of cardstock and Whip Cream. I used a piece of a dryer sheet under the cardtstock to help keep all the pieces in their place after die cutting them. It also helps to obtain a clean cut.
Then, I adhered the Whip Cream house over a piece of a FSJ White Liner Sheet. I trimmed around the house and then I adhered all the pieces to fill in the house. No particular order for the colors or pattern, I just had fun mixing the colors.
After that, I placed the card over a Whip Cream panel. Next, I used a a die and stamp set called Hello Expressions to make the sentiment.
I complemented with a couple of leaves, a tiny flower and a white gem. Finally, I adhered the panel over a folded card with foam squares. This card was fun to make, but I couldn’t expect less since this Botanical House is so pretty and fun to play with!