Today’s Card: Trick or Treat

Hi!

Quick post today, just to share a Halloween card made with Hero Arts products:

091415web_tricortreat2

For this card, I used the new Cubic Background stencil, sponges (makeup sponges), and three colors of Shadow Inks: Lime Green, Butter Bar and Orange Soda. I placed the stencil on a Snow layering paper panel and secured it with painters tape along the edges. Then, using a sponge, I applied the color over the panel, changing colors from section to section to create a multicolor effect. I used a different sponge for each color to avoid contaminating the ink pads. When the panel was completed, I carefully removed stencil. I adhered the panel on a black card base.

To create the focal point I used a woodblock stamp called Trick or Treat Pumpkin. I just stamped with Versamark Ink over a black square and I simply heat-embossed it with orange embossing powder (American Crafts – Zing). I adhered the black square with foam tape onto a green square, and then I adhered the whole piece over the front of the card. I Embellished the card with a piece of hemp and some black and orange pearls.

Well, that’s all from me for today, I will be back soon to share another card.

Thanks for stopping by  🙂 Have a wonderful crafty week!

marianasignat


Hero Arts Blog Post Sneak Peek

Hi there!

Today I am sharing a sneak peek of some Hero Arts projects that I created using a great stamp set called Halloween Borders:

Screen Shot 2015-09-27 at 6.13.42 PM

These projects and VIDEO were posted today on the Hero Arts blog, so if you haven’t seen them yet, please click HERE to see it along with the complete post.

Thanks for stopping by!  I hope you all have a wonderful crafty week!

marianasignat

RG Make Amazing Happen Design Team :)

Today I am very happy to share that I am honored to be joining the 2015-2016 Richard Garay Make Amazing Design Team along with a group of very talented designers. I am looking forward to start my crafty journey with this team!! So stay tuned because soon, I will be sharing projects using a fantastic line of products!Design Team_v

‪#‎makeamazinghappen‬ ‪#‎teamRichardGaray‬‪#‎FunStampersJourney‬ ‪#‎JourneyBlooms‬

Well, that’s all from me for today, I will be back tomorrow to share a project.

Thanks for stopping by  🙂 Have a wonderful crafty rest of the week!

marianasignat

Today’s Card: Merry Cactus to You

Hi!
I am back today to share a fun card featuring a cute clear set included in the 2015 Holiday Collection by Hero Arts. This set is called Merry Cactus to You and its matching frame cuts set is also available in the new Hero Arts Store!

092215web_merrycactus2u

To make the background I overlapped four different colors of layering paper. Then, on a white rectangular panel, I stamped the cactus using one of the new Ombré inks: Lime to Forever Green. The little winter hat and the cactus pot were stamped with Tide Pool and Orange Soda Mid-Tone Shadow inks. Then I die cut the images and I put foam underneath them. The sentiment was stamped with Navy Mid-Tone Shadow Ink. At the end, I put Glossy Accents over the hat and cactus pot, a little golden bow, and some gemstones on the cactus.

Well, that’s all from me for today, I will be back soon to share another project.

Thanks for stopping by  🙂 Have a wonderful crafty rest of the week!

marianasignat

STAMPtember® Exclusive: Hero Arts

herostamptember15

Happy Friday, everyone!

Today is the STAMPtember® Exclusive release of a fun set by Hero Arts for Simon Says Stamp. As part of the festivities I was kindly invited to play with this FABULOUS stamp & die combo called Prayers.
srha15

This stamp & die combo is just perfect to create a condolence card. I love that you have several additional words to give your card a meaningful personal message, and it also includes a die-cut sentiment 🙂

091715web_prayers

First, I created a partial floral background over a white panel using a HA set called Tea Flowers along with two Ombré ink pads: Light Purple to Grape Juice and Lime To Forever Green.  To create the sentiment I used the NEW Prayers combo. I started by stamping the complementary words using Black Dye Ink, leaving enough space between the two lines of words. Next, I die cut the main sentiment from a strip of layering paper and from foamy. I put the two pieces together and then, I adhered the whole piece between the stamped words. Finally, I adhered the panel to a card base, and I embellished it with some gemstones.

Well, that’s all from me for today, I will be back soon to share another card.

Thanks for stopping by  🙂 Have a wonderful crafty weekend!

marianasignat

Today’s Card: Winter Wishes

Hi!
Here is a card that I created using a fabulous stamp set by Hero Arts: Color Layering Dimensional Bird. I have to say that this set is one of my favorites from the 2015 Holiday Catalog  🙂
091415web_winterwishes

The outlined image of the bird was stamped with Black ink, and then I started to stamp each of the parts of the bird using Ombré inks. Additionally, I  stamped a flower that also is included in the set. I die-cut both images along with a piece of foamy with its matching frame cuts. Then, I adhered the pieces together. The branch and leaves were  stamped directly over a white panel. I stamped a sentiment with Versamark, and heat-embossed it with Platinum Embossing Powder. I decided to add an embossed line on two of the edges. To do that, I simply traced a line with a Versamark pen, and then heat-embossed the line with embossing powder. At the very end, I adhered the panel to a card base and I embellished the card with some clear gemstones. I really had a lot of fun making this card 🙂

supplies

Color Layering Dimensional Bird
Color Layering Dimensional Bird Frame Cuts
Snow Layering Paper
Blush Mix Layering Paper
Lime To Forever Green
Light to Red Royal
Tide Pool to Navy
Mint Julep to Emerald
Soft Brown to Cup O’Joe
Soft Granite to Black
Black Dye Ink
Butter Bar Mid-Tone Shadow Ink
Versamark Watermark Inkpad
Platinum Embossing Powder
Clear Gemstones
Others: White foamy, adhesive, Versamark Pen.

Well, that’s all from me for today, I will be back soon to share another project.

Thanks for stopping by  🙂 Have a wonderful crafty rest of the week!

marianasignat

Today’s Card: Trick or Treat

Hi there!
I hope you all had a nice weekend. Mine was excellent because I had time to make some cards without feeling pressured! I love when that happens!  Anyways, here is a Halloween card that I made using three different Hero Arts wood stamps
091415web_tricortreat

The Smiling Jack O Lantern image as well as the Spider in Web images were heat-embossed onto a black card. I heat-embossed the images using Orange and Green embossing powders by American Crafts (Zing!) I love the way the colors stand out over the dark background. The Trick or Treat Message was simply stamped over a strip of Snow Layering Paper with Black Ink. I added a piece of decorative tape under the sentiment strip, just to add a little bit of interest as well as some gemstones here and there.

Well, that’s all from me for today, I will be back soon to share another card.

Thanks for stopping by  🙂 Have a wonderful crafty week!

marianasignat

Today’s Card: Sending You Warm Wishes

Hi there!

Today I am sharing a card using the new Kelly’s Yeti Stamp & Cut which is adorable! This set comes with the Yeti image along with a bunch of sentiments, as well as its metal die-cuts…
090315web_warmwishes

I started by stamping the background using one of the new large cling backgrounds called Dot Moire Bold Prints with Mint Julep ink.  Then, I created a rectangle from Snow Layering paper. I drawed a curvy line, simulating the snow. I stamped one of the pine trees, a sentiment and trunk over the white rectangle. Then, I stamped and die-cut the Yeti and pine tree. I also die-cut foamy for them.  I colored the belly, face and hands with a marker, and then, I put glitter over the Yeti with a glue pen. At the end I put a mat with layering paper, and I adhered the whole piece over the card base. I embellished the card with clear gemstones.

supplies

Kelly’s Yeti Stamp & Cut 
Dot Moire Bold Prints
Winter Greens by Lia
Mint Julep Mid-Tone Shadow Ink
Black Dye Ink
Pool Mixed Layering Papers
Blush Mixed Layering Papers
Snow Layering Paper
Clear Gemstones
Glitter and Glue Pen

Well, that’s all from me for today, I will be back soon to share another project.

Thanks for stopping by  🙂 Have a wonderful crafty rest of the week!

marianasignat

Hero Arts Launch Party Blog Hop

BlogHop_700

Welcome to the Hero Arts Launch Party Blog Hop! If you are coming from talented Lucy Abrams‘ blog, you are in the right direction!

This hop is a celebration of the brand new Hero Arts website, which was launched on Tuesday, as well as a creative showcase of the new 2015 Holiday Collection. One of the things that I want to point out is that Hero Arts has a new shipping policy:  FREE shipping on US orders of $50 or more! No code needed. Isn’t that great? Anyway, there is more….

••• GIVEAWAY •••

Hero Arts is giving away one GRAND PRIZE $100 shopping spree. The winner will be randomly chosen from all of the blog hop comments received by 11:59pm PST on Tuesday, September 8th. Please check the Hero Arts blog for the announcement of the winner.

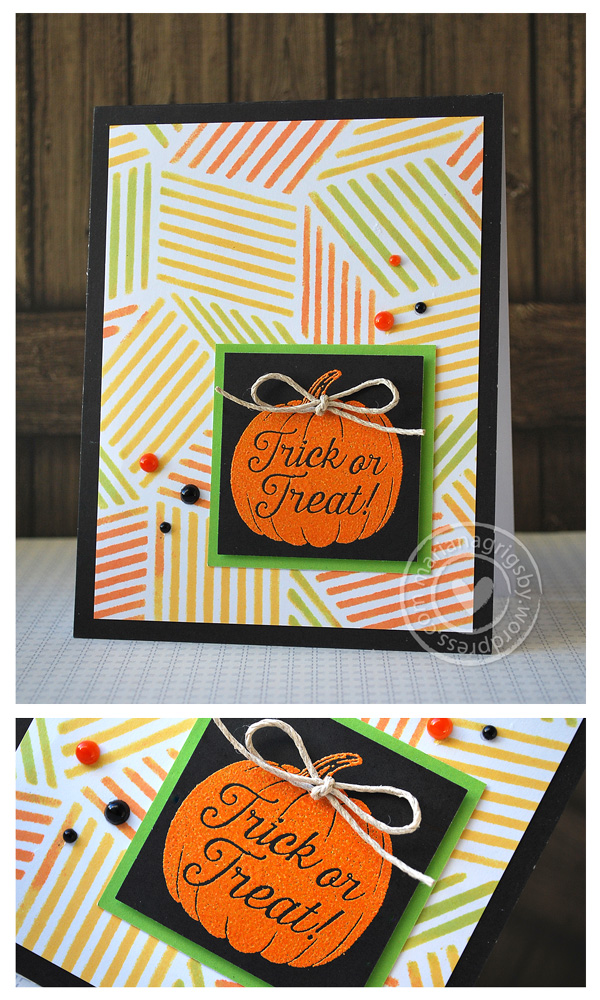
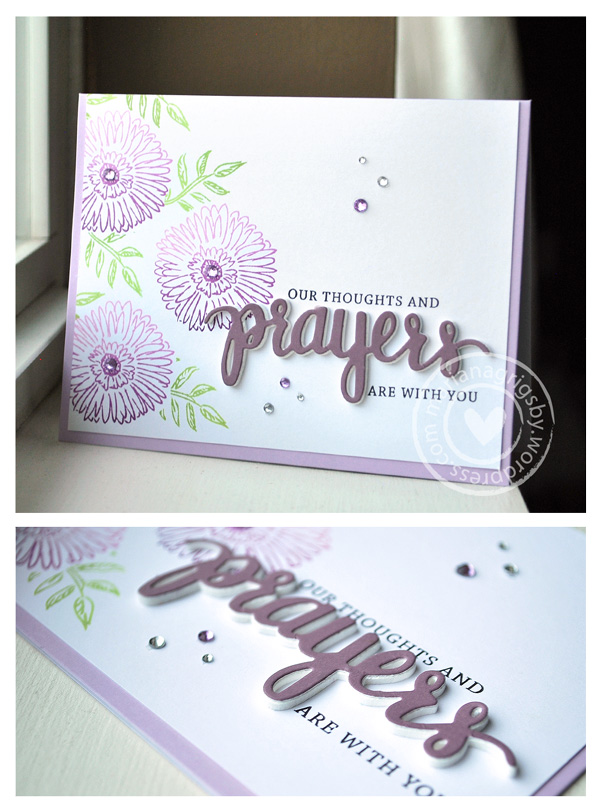
Well, for this special occasion I made a couple of cards featuring some of the new products. It was hard to decide which products to use, since all of them are fabulous! At the end I decided to use a pretty woodblock stamp along with a Stamp & Cut set to create this card:

090315web_joy
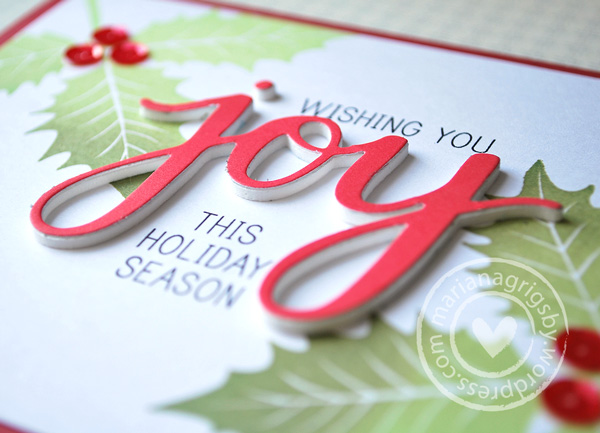
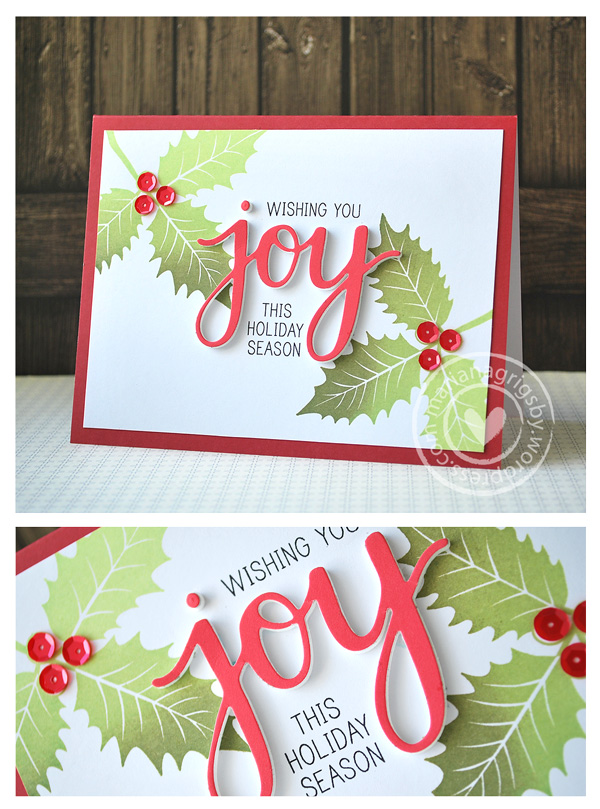
I have to say that the new Ombré inks are simply amazing. I stamped the Poinsettia with Berries woodblock stamp using Lime to Forever Green Ombré Ink…. and I just love how pretty the solid images look! Then, I die-cut the word Joy from layering paper and foamy. I also stamped some complementary words with Black Dye Ink, and I embellished the card with some red sequins 🙂

090315web_joy2

Here the complete list of supplies to create this card:

Poinsettia with Berries
Joy Stamp & Cut
Lime to Forever Green Ombré Ink
Black Dye Ink
Blush Mixed Layering Paper
Snow Layering Paper


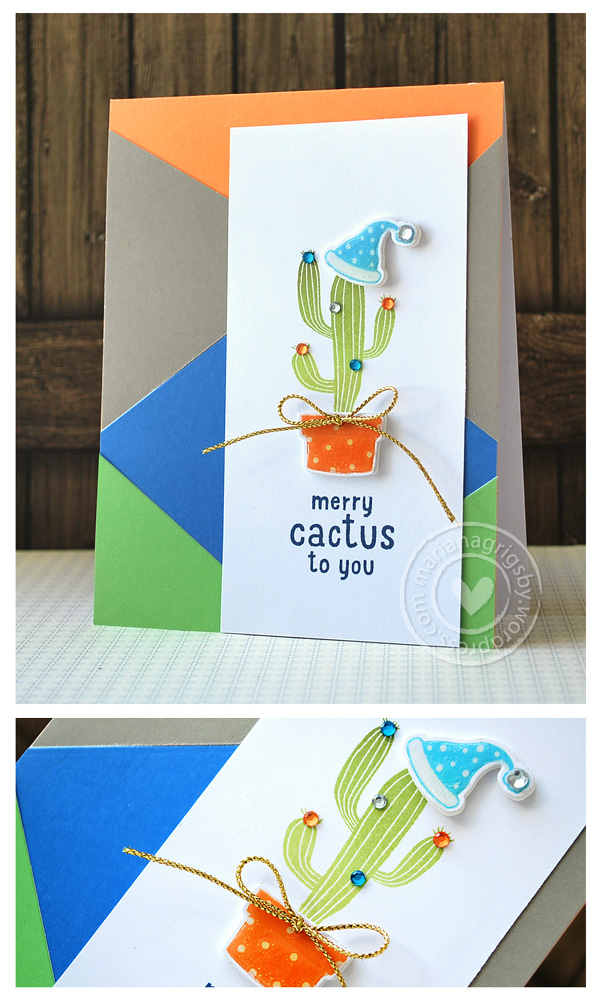
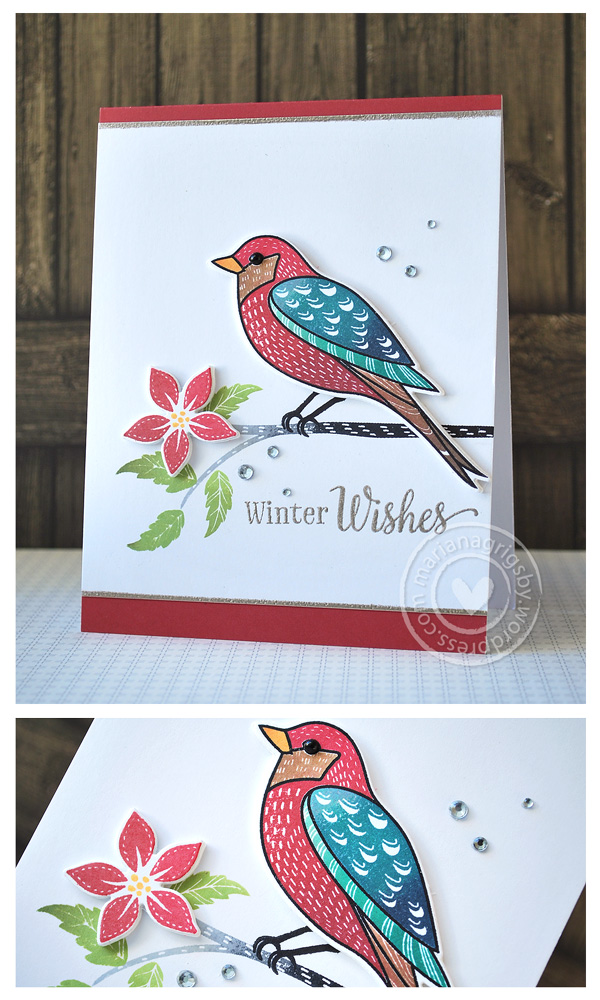
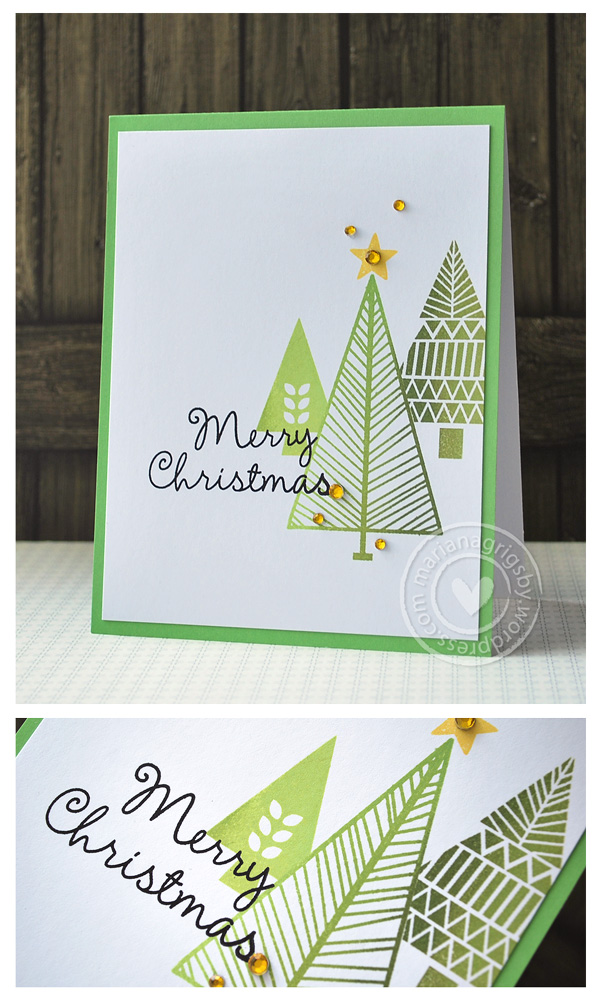
My second card is quite simple and features another fabulous set that belongs to the Kelly Purkey Collection. This set is a  3″ x 4″ clear set called Kelly’s Noel. I also used the Lime to Forever Green Ombré Ink for the pine trees, and Black Dye Ink to stamp the sentiment. This sentiment is included in a 4″ x 6″ clear set called Animal Blessings. At the end, I added some yellow gemstones as embellishment.

090315web_merrychristmas

Here is the list of supplies of the second card:

Kelly’s Noel
Animal Blessings
Lime to Forever Green Ombré Ink
Butter Bar Mid-Tone Shadow Ink
Black Dye Ink
Blush Mixed Layering Paper
Snow Layering Paper


Now is time to hop over the talented Libby Hickson‘s blog. I am including here the complete list of participants, just in case you you need it 🙂 Please don’t forget to leave a comment on each blog  for the chance to win the amazing prize 🙂

Hero Arts
Jennifer McGuire
Kelly Rasmussen
Laura Bassen
Debby Hughes
Amy Tsuruta
Kristina Werner
Yana Smakula
Suzanne Dahlberg
Nichol Magouirk
Clare Prezzia
Lucy Abrams
>>>Mariana Grigsby<<<
Libby Hickson

 Thanks for stopping by! Good Luck to all!

PLEASE NOTICE THAT MY COMMENT LINK FOR THIS POST IS LOCATED AT THE BEGINNING OF THIS POST, RIGHT BELOW THE TITLE↑↑↑ 


New Hero Arts Website

LaunchParty_2
Hi!

I am happy to share that as of today, the Hero Arts website has a new look & feel, with a much improved store interface. As part of this occasion Hero Arts is offering free shipping on all US orders of $50 or more! Additionally, they are giving away a FREE STAMP SET with all orders (while supplies last). I have to point out that ALL the Holiday products are now available, so this is a good time to order your favorite stamps from the Holiday Catalog! You can click HERE or on the graphic above to hop over the new HA website.

On Friday… more surprises coming to you… Stayed tuned!

Well, that’s all from me for today, I will be back soon to share a project.

Thanks for stopping by  🙂 Have a wonderful crafty week!

marianasignat